| This documentation is out of date.
The new version of the documentation is here: https://cannylogic.com/docs |
Difference between revisions of "Firmware Update Utility"
| [unchecked revision] | [unchecked revision] |
(Initial edit) |
|||
| (12 intermediate revisions by 2 users not shown) | |||
| Line 1: | Line 1: | ||
| − | + | IDE CannyLab allows users to create a custom standalone executable EXE-file containing controller system software and a function diagram. | |
| + | The purpose of this file is quick and easy controller configuration in a fashion that’s comprehensible to the end user, as well as uploading software to the controller without relying on CannyLab IDE. From now on, we will refer to such files as firmware update utilities or SFX files (SFX standing for self-flashing). | ||
| − | + | === Creating an SFX file === | |
| − | + | Call the SFX file creation dialog elect «Service» → «Create SFX» in the main menu. | |
| − | + | ||
| − | + | ||
[[File:4_9_1_1.png]] | [[File:4_9_1_1.png]] | ||
| − | + | First of all, you must specify the controller type for which the SFX file will be created. In the drop-down list, choose one of the available controller types: Canny 7, Canny 5, Canny 5 Nano. | |
| − | + | In the dialog box, you must specify the names and full paths to the following files: the source «.ccx» firmware file, the source «.cfd» function diagram file and the resulting «.exe» SFX file. | |
| − | + | The text field of the "Comment" tab is used to enter and edit the text message, that’s displayed when running the resulting SFX file. This may be information about the files included in it, their versions and names, brief instructions on the use of the firmware update utility, information about the purpose of user-defined parameters if any are used, a brief description of the functions implemented by the software. | |
| − | + | The "Settings" tab is used for specifying the names, types and, where applicable, available values, of the parameters that the user will be able to configure when running the SFX file. | |
[[File:4_9_1_2.png]] | [[File:4_9_1_2.png]] | ||
| − | + | The maximum number of parameters available for user configuration is 16. When creating an SFX file, you need to specify the display name and type for each parameter. The two available types are "Number" and "List." To enable a parameter, click it in the column on the left and then tick the checkbox in the right panel. | |
| − | + | When launching an SFX file, the user will be able to configure a "number" type parameter by specifying a numeric value. A "list" type parameter will be configured by choosing an item from a drop-down list. Available list items are configured when creating the SFX file. | |
| − | + | The newly created SFX file can be transferred to any storage medium, emailed or published on the Internet, and finally downloaded and used by the end user for flashing and setting the controller parameters without the use of any additional software. | |
{| | {| | ||
| − | |valign="top" style="padding-left:0.5em;"|''''' | + | |valign="top" style="padding-left:0.5em;"|'''''ATTENTION!''''' |
| − | |valign="top" style="padding-left:0.5em;"|''''' | + | |valign="top" style="padding-left:0.5em;"|'''''Despite their absolute harmlessness, SFX files created by CannyLab have a structure that’s unusual for Windows, which is deemed suspicious by some antivirus software. Antivirus software may throw a warning or even delete or quarantine the SFX file when attempting to create or access it. If you are faced with this situation, exclude the SFX file from your antivirus scanning operations or mark it as an exception. The exact process depends on your antivirus software.''''' |
|} | |} | ||
| − | + | After setting up the SFX file parameters, click '' Create '' to save the resulting executable file to your disk drive. | |
{| | {| | ||
| − | |valign="top" style="padding-left:0.5em;"|'' | + | |valign="top" style="padding-left:0.5em;"|''Note:'' |
| − | |valign="top" style="padding-left:0.5em;"|'' | + | |valign="top" style="padding-left:0.5em;"|''The system software (.ccx) and diagram (.cfd) files designed for a specific type of controller are incompatible with other types of controllers and can not be used with them. In case incorrect source data is used, the SFX file will not be created, and the user will be shown an error message.'' |
|} | |} | ||
| − | + | Additionally, the export procedure saves the comment content and the description of the SFX parameters to a text file. These can later be used to import all the set options when creating an SFX file in the future, to avoid re-entering data. | |
| − | === | + | === Using the utility === |
| − | + | After launching the executable SFX file, the comment is displayed on the left side of the window, while the status bar and configurable parameters are displayed on the right. | |
[[File:4_9_2_1.png]] | [[File:4_9_2_1.png]] | ||
| − | + | The comment field contains the comment written during creation of the SFX file. | |
| − | + | The parameter area is used for configuring parameter values. Number-type parameters are typed in, list-type parameters are selected from a drop-down list. If no parameters were specified for use during the creation of the SFX file created, this area will be empty. | |
| − | + | User-selected parameter values will be available to the functional diagram in registers [[CANNY 7, User Preprogrammed Parameters|«User Preprogrammed Parameters»]] after the controller is flashed. | |
{| | {| | ||
| − | |valign="top" style="padding-left:0.5em;"|'' | + | |valign="top" style="padding-left:0.5em;"|''Note:'' |
| − | |valign="top" style="padding-left:0.5em;"|'' | + | |valign="top" style="padding-left:0.5em;"|''A large enough comment or a large number of parameters can not fit into the corresponding window panel in their entirety. Use the appropriate scroll bar for navigation.'' |
|} | |} | ||
| − | + | To upload the configured parameter values and software contained in the SFX file into the controller, unplug the controller from its external power supply and connect it to the PC via a standard miniUSB cable, controller's green LED will light up. If it’s the first time the controller has been connected, Windows will report the discovery of a new standard device and automatically install the driver for it. | |
| − | + | Prior to establishing communication with the controller, the message '' <The device is not connected> '' will be displayed in the status bar and the button '' <Write> '' will not be available. After the connection is established successfully, the controller Green LED will start blinking, the status bar will display ''The device is ready to record'' and the button '' <Write> '' will be active. | |
{| | {| | ||
| − | |valign="top" style="padding-left:0.5em;"|'' | + | |valign="top" style="padding-left:0.5em;"|''Note:'' |
| − | |valign="top" style="padding-left:0.5em;"|'' | + | |valign="top" style="padding-left:0.5em;"|''In order to avoid issues and errors while working with the utility, do not run multiple SFX files or connect more than one controller to the PC at a time.'' |
|} | |} | ||
| − | + | To begin uploading software to the controller, click '' <Write> ''. The status bar will display the progress of the upload process. | |
| − | + | Upon successful completion of the software upload, the status bar will display '' <Write complete> ''. | |
| − | + | If the software recording process is interrupted by user or an error occurs, the status bar will show the message ''<There was an error recording> ''. In this case, the uploading process should be repeated. | |
| − | == | + | == See also == |
[[CANNY Lab]] | [[CANNY Lab]] | ||
Latest revision as of 13:05, 11 December 2020
IDE CannyLab allows users to create a custom standalone executable EXE-file containing controller system software and a function diagram. The purpose of this file is quick and easy controller configuration in a fashion that’s comprehensible to the end user, as well as uploading software to the controller without relying on CannyLab IDE. From now on, we will refer to such files as firmware update utilities or SFX files (SFX standing for self-flashing).
Creating an SFX file
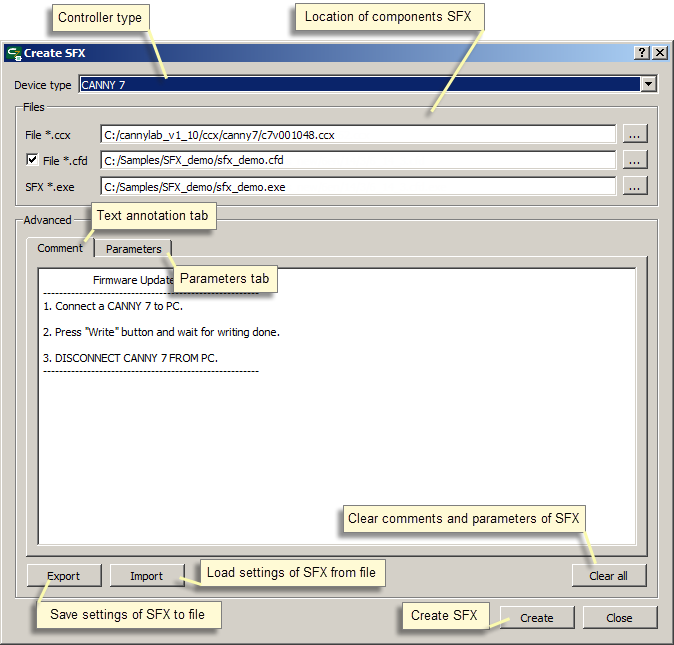
Call the SFX file creation dialog elect «Service» → «Create SFX» in the main menu.
First of all, you must specify the controller type for which the SFX file will be created. In the drop-down list, choose one of the available controller types: Canny 7, Canny 5, Canny 5 Nano.
In the dialog box, you must specify the names and full paths to the following files: the source «.ccx» firmware file, the source «.cfd» function diagram file and the resulting «.exe» SFX file.
The text field of the "Comment" tab is used to enter and edit the text message, that’s displayed when running the resulting SFX file. This may be information about the files included in it, their versions and names, brief instructions on the use of the firmware update utility, information about the purpose of user-defined parameters if any are used, a brief description of the functions implemented by the software.
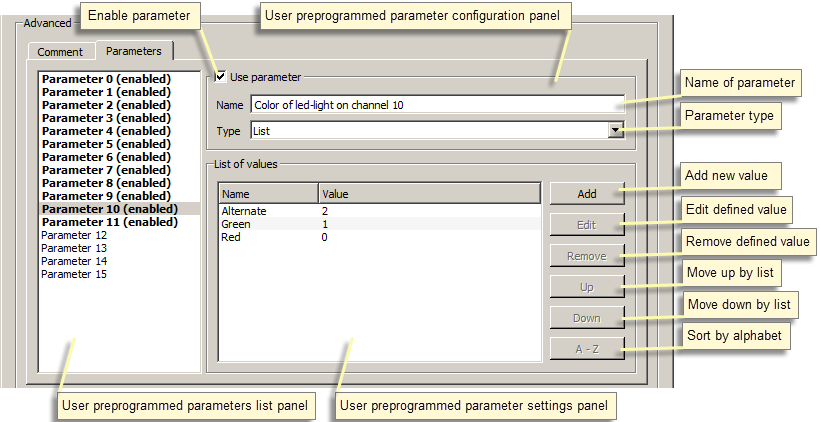
The "Settings" tab is used for specifying the names, types and, where applicable, available values, of the parameters that the user will be able to configure when running the SFX file.
The maximum number of parameters available for user configuration is 16. When creating an SFX file, you need to specify the display name and type for each parameter. The two available types are "Number" and "List." To enable a parameter, click it in the column on the left and then tick the checkbox in the right panel.
When launching an SFX file, the user will be able to configure a "number" type parameter by specifying a numeric value. A "list" type parameter will be configured by choosing an item from a drop-down list. Available list items are configured when creating the SFX file.
The newly created SFX file can be transferred to any storage medium, emailed or published on the Internet, and finally downloaded and used by the end user for flashing and setting the controller parameters without the use of any additional software.
| ATTENTION! | Despite their absolute harmlessness, SFX files created by CannyLab have a structure that’s unusual for Windows, which is deemed suspicious by some antivirus software. Antivirus software may throw a warning or even delete or quarantine the SFX file when attempting to create or access it. If you are faced with this situation, exclude the SFX file from your antivirus scanning operations or mark it as an exception. The exact process depends on your antivirus software. |
After setting up the SFX file parameters, click Create to save the resulting executable file to your disk drive.
| Note: | The system software (.ccx) and diagram (.cfd) files designed for a specific type of controller are incompatible with other types of controllers and can not be used with them. In case incorrect source data is used, the SFX file will not be created, and the user will be shown an error message. |
Additionally, the export procedure saves the comment content and the description of the SFX parameters to a text file. These can later be used to import all the set options when creating an SFX file in the future, to avoid re-entering data.
Using the utility
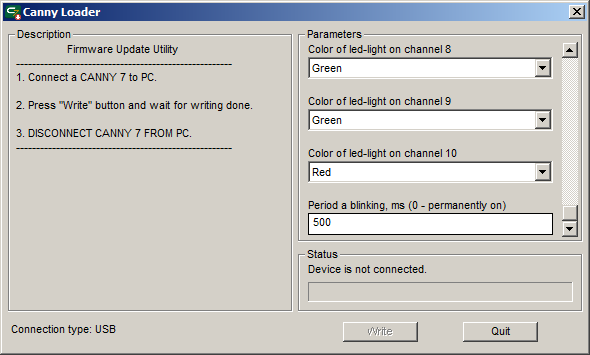
After launching the executable SFX file, the comment is displayed on the left side of the window, while the status bar and configurable parameters are displayed on the right.
The comment field contains the comment written during creation of the SFX file.
The parameter area is used for configuring parameter values. Number-type parameters are typed in, list-type parameters are selected from a drop-down list. If no parameters were specified for use during the creation of the SFX file created, this area will be empty.
User-selected parameter values will be available to the functional diagram in registers «User Preprogrammed Parameters» after the controller is flashed.
| Note: | A large enough comment or a large number of parameters can not fit into the corresponding window panel in their entirety. Use the appropriate scroll bar for navigation. |
To upload the configured parameter values and software contained in the SFX file into the controller, unplug the controller from its external power supply and connect it to the PC via a standard miniUSB cable, controller's green LED will light up. If it’s the first time the controller has been connected, Windows will report the discovery of a new standard device and automatically install the driver for it.
Prior to establishing communication with the controller, the message <The device is not connected> will be displayed in the status bar and the button <Write> will not be available. After the connection is established successfully, the controller Green LED will start blinking, the status bar will display The device is ready to record and the button <Write> will be active.
| Note: | In order to avoid issues and errors while working with the utility, do not run multiple SFX files or connect more than one controller to the PC at a time. |
To begin uploading software to the controller, click <Write> . The status bar will display the progress of the upload process.
Upon successful completion of the software upload, the status bar will display <Write complete> .
If the software recording process is interrupted by user or an error occurs, the status bar will show the message <There was an error recording> . In this case, the uploading process should be repeated.


