| This documentation is out of date.
The new version of the documentation is here: https://cannylogic.com/docs |
Difference between revisions of "Firmware Update Utility"
| [unchecked revision] | [unchecked revision] |
(→Creating SFX-file) |
(→Использование утилиты автоматической загрузки ПО в контроллер) |
||
| Line 39: | Line 39: | ||
The export procedure saves the comments content and the description of the SFX parameter to a text file, with an option to import to create SFX-file in the future, to avoid having to re-input data. | The export procedure saves the comments content and the description of the SFX parameter to a text file, with an option to import to create SFX-file in the future, to avoid having to re-input data. | ||
| − | === | + | === The use of automatic loading software utility === |
| − | + | When launching the executable automatic loading software utility file, the dialog box is displayed on the left side of which is the comment area, and on the right - the task bar of parameter values and status bar. | |
[[File:4_9_2_1.png]] | [[File:4_9_2_1.png]] | ||
| − | + | The comments field reflects the information provided in the appropriate field when SFX-file created. | |
| − | + | The parameters area is filled with elements, allowed to set the values in the mode provided when SFX-file created — by selecting values from the list or by typing it with the keyboard. If parameters description was not specified when SFX-file created, this area will be empty. | |
| − | + | User-selected parameter values will be available to the functional diagram in registers [[CANNY 7, User Preprogrammed Parameters|«Регистр параметра пользовательской конфигурации №ХХ»]] after controller loading. | |
{| | {| | ||
Revision as of 13:56, 8 July 2016
IDE CannyLab allows users to create a custom stand-alone executable EXE-files containing the system controller software and a functional diagram.
The purpose of this file is a fast configure the controller in understandable to the final consumer view and a simple software loading to the controller using a computer without installed CannyLab IDE. In the future, such a file will be called: a self extracting software or the SFX-file.
Creating SFX-file
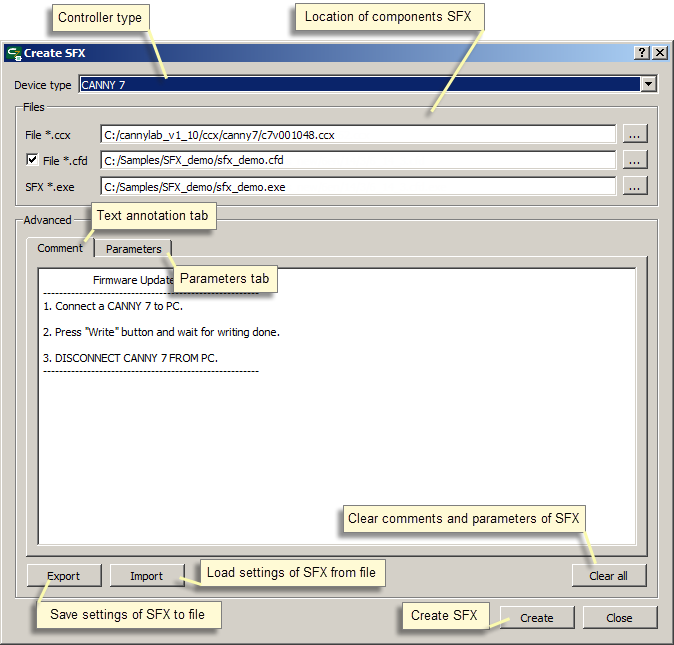
Call dialogue create SFX-file is done by selecting «Service» → «Create SFX» of main window
First of all, you must specify the type of controller for which SFX-file will be created. In the drop-down list to choose one of the proposed controller types: Canny 7, Canny 5, Canny 5 Nano.
In the dialog box, you must specify the names and full paths to files: the source system software «.ccx», the source file of the functional diagram «.cfd» and the resulting SFX «.exe» file.
The text field of the "Comment" tab is used to enter and edit text message, that the user will see when running the obtained SFX-File. This may be information about the files included in it, their versions, and names, brief instructions on the use of automatic software loading utility, Information about the purpose of user-defined parameters, if used, a brief description of the functions implemented by software.
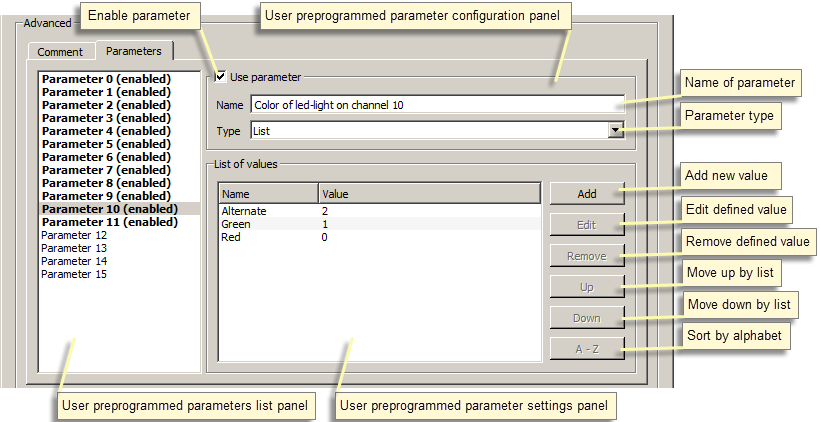
The "Settings" tab is intended to specify the names and types of parameters, the values of which will be asked to choose by the user when run automatic software loading utility.
The maximum number of options that are available for selection by the user is 16. When creating a SFX-file, each parameter specifies with the display name and type. The parameter may be one of two types - "Number" and "List."
When launching SFX-file, set the parameter "number" type will be performed by the user by typing a numeric value. Setting the parameterof "List" type - a choice for the title of the corresponding item from the drop-down list.
Created in this way file can be transferred on a media, emailed or published on the Internet and used by the end user to download and setting of the controller parameters without the use of any additional software.
| ATTENTION! | Despite its absolute harmlessness, SFX-files created by CannyLab have an unusual structure for Windows which is suspicious for some of antivirus software. Antivirus software may give a warning or even delete the file when you create it, or try to access it. If you are faced with a similar situation, exclude the SFX-file from your antivirus scanning operations. |
At the end of settings SFX-file parametrs and pressing the button Create , resulting executable file will be saved to the HDD.
| Note: | The system software files (.ccx) and the diagram files (.cfd), designed for a specific type of controller is not compatible with other types of controllers and can not be used with them. When attempting to use incorrect source data, the SFX-file will not be created, and the user will receive an error warning. |
The export procedure saves the comments content and the description of the SFX parameter to a text file, with an option to import to create SFX-file in the future, to avoid having to re-input data.
The use of automatic loading software utility
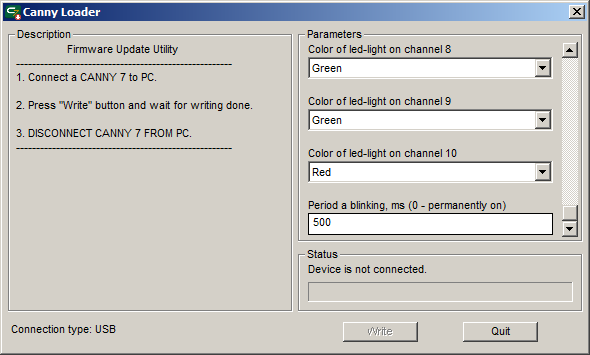
When launching the executable automatic loading software utility file, the dialog box is displayed on the left side of which is the comment area, and on the right - the task bar of parameter values and status bar.
The comments field reflects the information provided in the appropriate field when SFX-file created.
The parameters area is filled with elements, allowed to set the values in the mode provided when SFX-file created — by selecting values from the list or by typing it with the keyboard. If parameters description was not specified when SFX-file created, this area will be empty.
User-selected parameter values will be available to the functional diagram in registers «Регистр параметра пользовательской конфигурации №ХХ» after controller loading.
| Примечание: | При большом объеме комментария и большом числе используемых параметров, они могут не полностью помещаться в соответствующих панелях диалогового окна. Для доступа ко всему содержимому панелей, предусмотрены полосы вертикальной прокрутки в их правых частях. |
Для загрузки выбранных значений параметров и ПО содержащегося в SFX-файле в контроллер, отключите контроллер от внешнего питания и соедините его с ПК посредством стандартного кабеля miniUSB, зеленый светодиод контроллера при этом включится. При первом подключении контроллера, Windows сообщит об обнаружении нового стандартного устройства и автоматически установит драйвер для него.
До момента установления связи с контроллером, в панели состояния будет отображена надпись «Устройство не подключено», кнопка «Запись» будет недоступна. После успешного установления связи, зеленый светодиод контроллера начнет прерывисто мерцать, в панели состояния отобразится надпись «Устройство готово к записи» и кнопка «Запись» станет активна.
| Примечание: | Во избежание сбоев в работе утилиты, не запускайте несколько SFX-файлов и не подключайте к ПК более одного контроллера одновременно. |
Для начала загрузки ПО в контроллер нажмите кнопку «Записать». В строке состояния будет отображаться ход процесса записи.
В случае успешного окончания записи ПО в контроллер в панели состояния появится сообщение «Запись закончена».
Если процесс записи ПО в контроллер был прерван по команде пользователя или во время записи произошла ошибка, в панели состояния появится сообщение «Возникла ошибка записи». В данном случае, процесс записи должен быть повторен.


