| This documentation is out of date.
The new version of the documentation is here: https://cannylogic.com/docs |
CANNY 7 Demo Kit
The CANNY 7 Demo Kit designed to power, control, test and demonstrate IO features of CANNY 7 programmable logic controller.
Contents
What can you do with CANNY 7 Demo Kit
- upload the firmware and functional diagrams to the controller;
- run the controller with loaded firmware in operating mode;
- fast switching between operating mode and firmware uploading mode without cable reconnecting;
- power the controller from a standard PC's USB port through built-in CANNY 7 Demo Board's 5V-to-12V converter or by external power source connected to EXT1 port;
- control the status of the controller's IO channels using the built-in LEDs: the brightness of the LED shows the current on the IO channel and the color indicates the polarity of the signal;
- imitation of external input signals using press-buttons allows to send signals of positive or negative polarity to corresponding IO controller's channels.
Safety notes
- Do not allow interaction of moisture and metal objects with the elements and surfaces of the boards. If not, electric shock, short circuit or abnormal operation may occur.
- Prevent static spark discharge, use grounding devices.
- Do not connect the Demo Kit to the external circuits with voltages higher than 18V.
| WARNING!!! | Improper use may cause permanent damage to the CANNY 7 Demo Kit and/or to connected devices. |
Demo Kit components
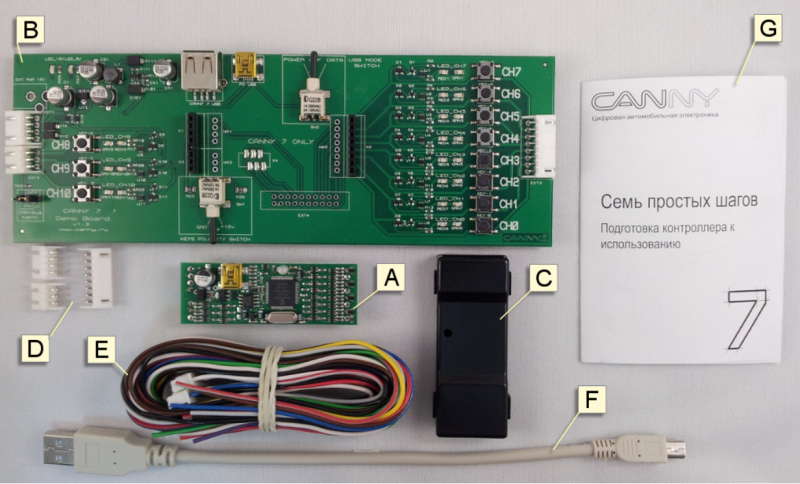
Programmable logic controller CANNY 7 included in CANNY 7 Demo Kit, comes with modified external connectors, compatible with CANNY 7 Demo Board's socket.
|
A - CANNY 7 programmable logic controller; B - CANNY 7 Demo Board; C - original plastic enclosure for CANNY 7 controller; D - original connectors Х1, Х2 and Х3 set for CANNY 7; E - cable set for external connections to Х1, Х2 and Х3; F - two USB-a/miniUSB interface cables; G - Quick Start Guide. |
Set of original CANNY 7 connectors, comes with CANNY 7 Demo Kit, allows user to bring CANNY 7 controller to basic appearance by replacing mounted connectors (soldering needed!) and putting in an included plastic enclosure.
Connector cables set allows to connect demo board or controller to external actuating and signaling devices.
Interface cables USB-A/miniUSB are intended to connect demo board and attached controller, allowing to load user programs to controller's memory, and also to provide powering of controller during testing by connecting demo board to USB port of PC.
Demo board features
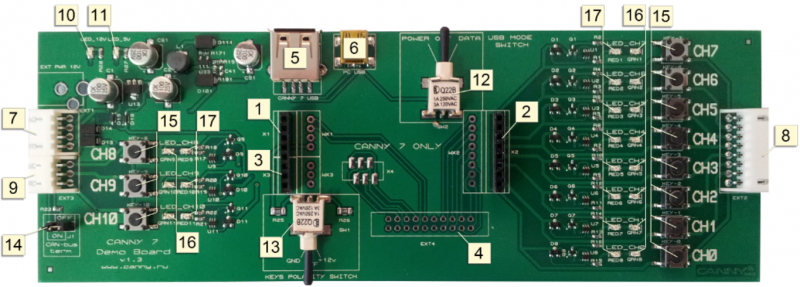
Components of demo board have designations printed on board's surface. Common view of demo board presented on next picture. Main elements of CANNY 7 Demo Board are marked by corresponding numbers.
|
1 - 4-pin connector Х1; 2 - 8-pin connector Х2; 3 - 3-pin connector Х3; 4 - area for optional mounting of 20-pin connector BH-20; 5 - USB-A port; 6 - miniUSB port; 7 - external 4-pin connector EXT1; 8 - external 8-pin connector EXT2; 9 - external 3-pin connector EXT3; |
10 - LED +12В power indicator; 11 - LED +5В power indicator; 12 - port 6 (miniUSB) USB Mode Switch; 13 - Keys Polarity Switch; 14 - CAN-bus terminator jumper-switch J1; 15 - push-buttons (keys) of manual external input signaling imitation; 16 - green controlling LEDs; 17 - red controlling LEDs. |
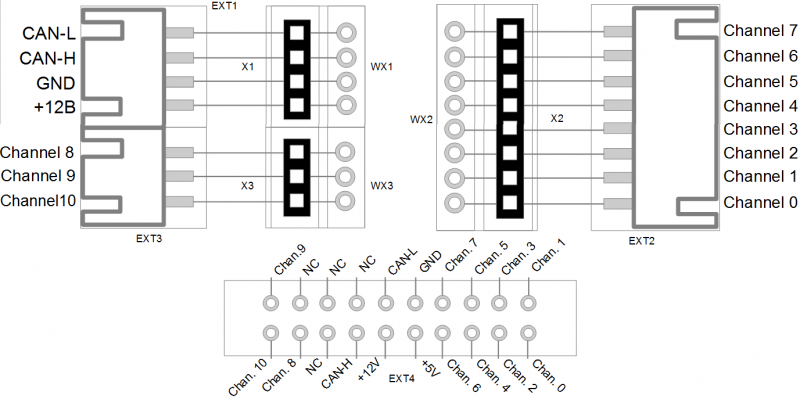
Demo Board connector's and contacts pinout
Getting started
Download integrated development environment CannyLab at www.cannylogic.com/downloads.
Before you start working with the development kit, study the CannyLab user guide at www.cannylogic.com.
Unpack the CANNY 7 Demo Kit.
Connect the CANNY 7 Demo Board with the controller installed using the miniUSB interface cable included in the CANNY 7 Demo Kit, connecting the CANNY 7 Demo Board USB-A port (5) to the miniUSB port of the CANNY 7 controller.
Turn the Keys Polarity Switch (13) and USB Mode Switch (12) of the CANNY 7 Demo Board to the «OFF» position.
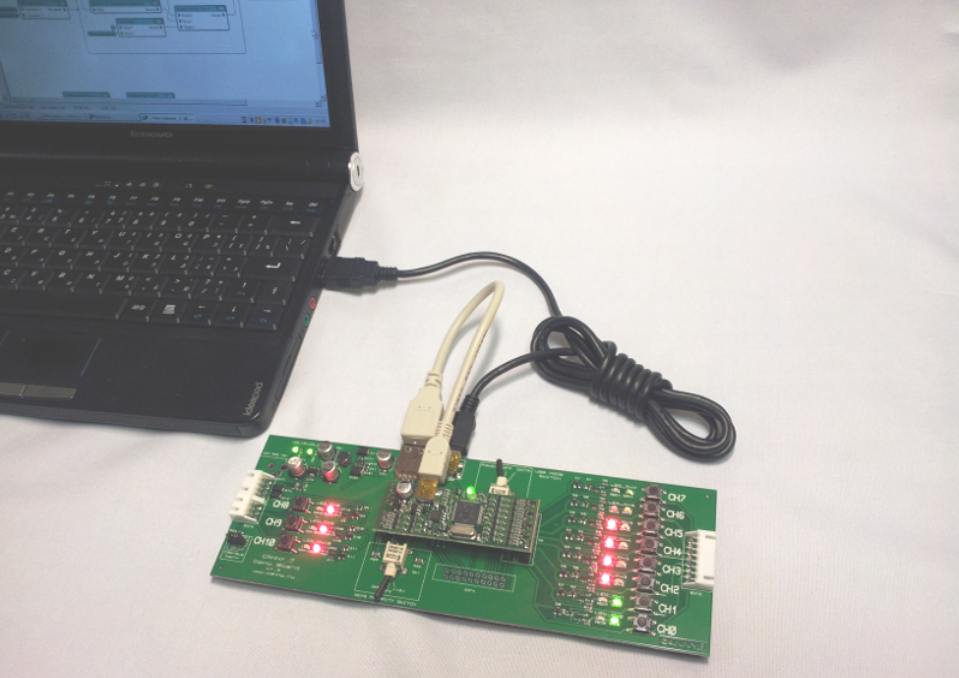
Connect the assembled CANNY 7 Demo Kit to PC / Laptop using the second included miniUSB interface cable by connecting the demo board miniUSB connector (6) to the USB-A connector of the personal computer.
Assembled CANNY 7 Demo Kit is shown on next picture.
Working with CANNY 7 Demo Kit
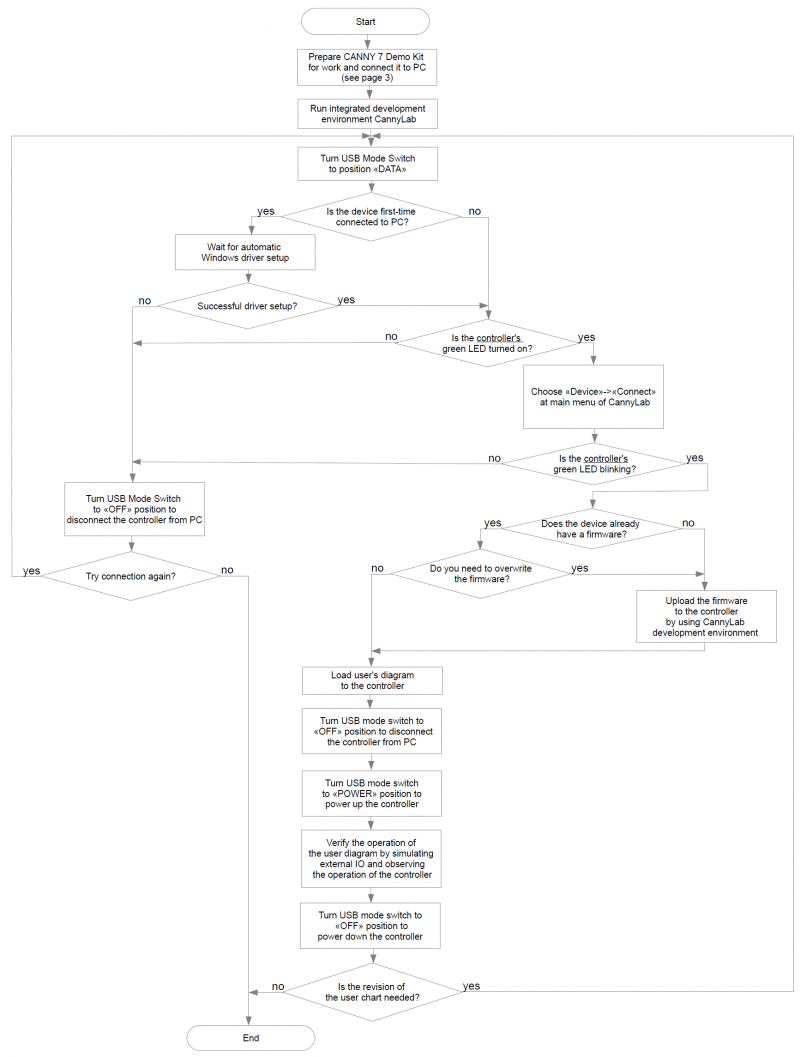
The normal order of using CANNY 7 Demo Kit is presented in flowchart at next picture.
Push-buttons (keys) are used to imitate external input signals at the controller's channels by user if needed. To control the common polarity of the push-buttons at the input channels of the controller, Keys Polarity Switch (13) is provided.
| Note: | In some modes, the operation of the controller as part of the CANNY 7 Demo Kit may differ from its operation in the autonomous mode due to the slight influence of the active elements of the demo board on the input / output circuits of the controller. |
